The AR-15 family of rifles really has turned into the modern day Erector Set for adults (hopefully you are old enough to know what an Erector Set is…). You can build your own, or buy a factory gun, and then you can modify it to your heart’s content, and then keep going. You can customize just about every single aspect of the gun to suit your particular wants or needs, from grips and stocks, to precision triggers, to different length or configuration forends, with iron sights, a red dot or a magnified scope, different barrel lengths, profiles and calibers. They are not only extremely customizable, but partly due to that customizability, they can also turn into quite the money pit.
Over the years, I’ve bought a number of complete factory rifles and then spent nearly as much money again in outfitting them to suit me. More recently, I began building my own from the ground up. With the right tools, some know how, and by selecting good quality parts, you might be surprised just what you can build.
When shopping for complete factory rifles, there are many routes one can take. Inexpensive AR’s are not difficult to find these days and for that matter, neither are lightweight AR’s. However, finding a lightweight AR with a great trigger, excellent accuracy and reliability, at a low price, now that is indeed a challenge.
Inexpensive
You can get a decent AR from a moderately well-known company for around $700 (MSRP). At that price, you will likely get a 16” M4 style carbine with milspec (or close) parts, and standard milspec trigger, GI style pistol grip and M4 style buttstock, and a weight of just under 6 pounds. In my experience with rifles of this price range, they are (speaking generally of course) decent guns. They usually function fairly reliably, with proper maintenance, and are usable, but they are not precision guns, the furniture is mediocre, the triggers are acceptable at best, and the barrels are okay. They are an okay gun for the money, but nothing to write home about.
Lightweight
On the other end of the spectrum are the very lightweight guns. Mag Tactical Systems makes a number of very lightweight, high quality guns using a proprietary magnesium alloy for both the upper and lower receivers. Their base guns weigh in at 5.1 pounds and start at $1400. Getting even more extreme, Battle Arms Development is taking pre-orders for their OIP Rifle. It has a skeletonized magwell, material removed from the upper receiver thinning the walls, carbon fiber, fluted/dimpled barrel, etc. All that effort brings the gun in just under 4 pounds, but at a premium cost of $2879.
Possible Compromise?
Having built a few rifles over the years, I figured there had to be a happy medium between price and weight. Having built rifles on both factory stripped forged aluminum lowers and 80% polymer lowers, I knew the polymer lowers were noticeably lighter, even though I never weighed them to measure the difference. Also, I have completed a few of them, from a couple of different companies for different articles, and despite some concerns about their longevity, I have yet to have one of them fail, even the ones that I felt less sure about. My favorite brand, based on many factors including what you get in the box, the quality, fit, finish and ease of assembly once machined, was by far the James Madison Tactical product, so I decided to use their Gen2 lower as the basis for this rifle.
In my opinion, the only issue that concerns me with polymer lowers is the precise alignment needed for the trigger and hammer pins, and seeing as those pins are under constant spring pressure, in my mind there is a possibility that those holes could wear/drift during the life of the rifle. To deal with that issue, I have found using a complete drop-in trigger pack eliminates all concerns, with the added benefit of providing a significantly improved trigger over a standard milspec lower parts kit trigger. Since lower parts kits are available with or without the trigger and hammer, selecting the appropriate kit drops the cost and that savings can go toward the trigger of your choice. In that regard, I chose a CMC drop-in trigger, which comes complete with screw retained pins and are available in several models, with flat or arched triggers, single or dual stage, and in various pull weights. In keeping with one of the primary goals of this project, they are also relatively inexpensive when compared to many of the other AR trigger packs that are out there.
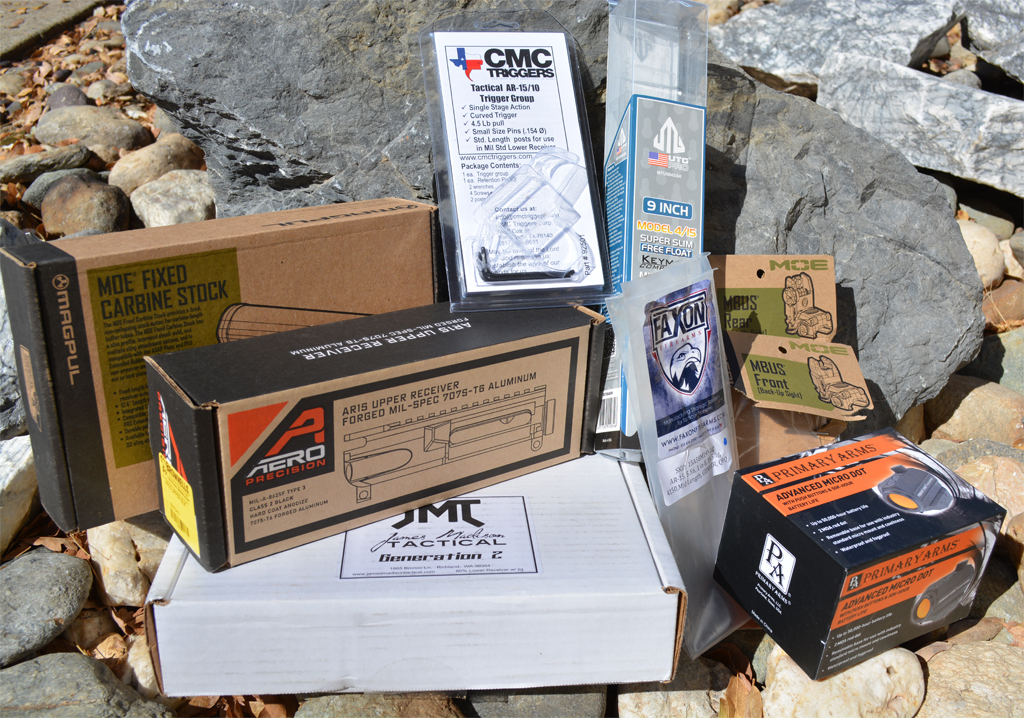
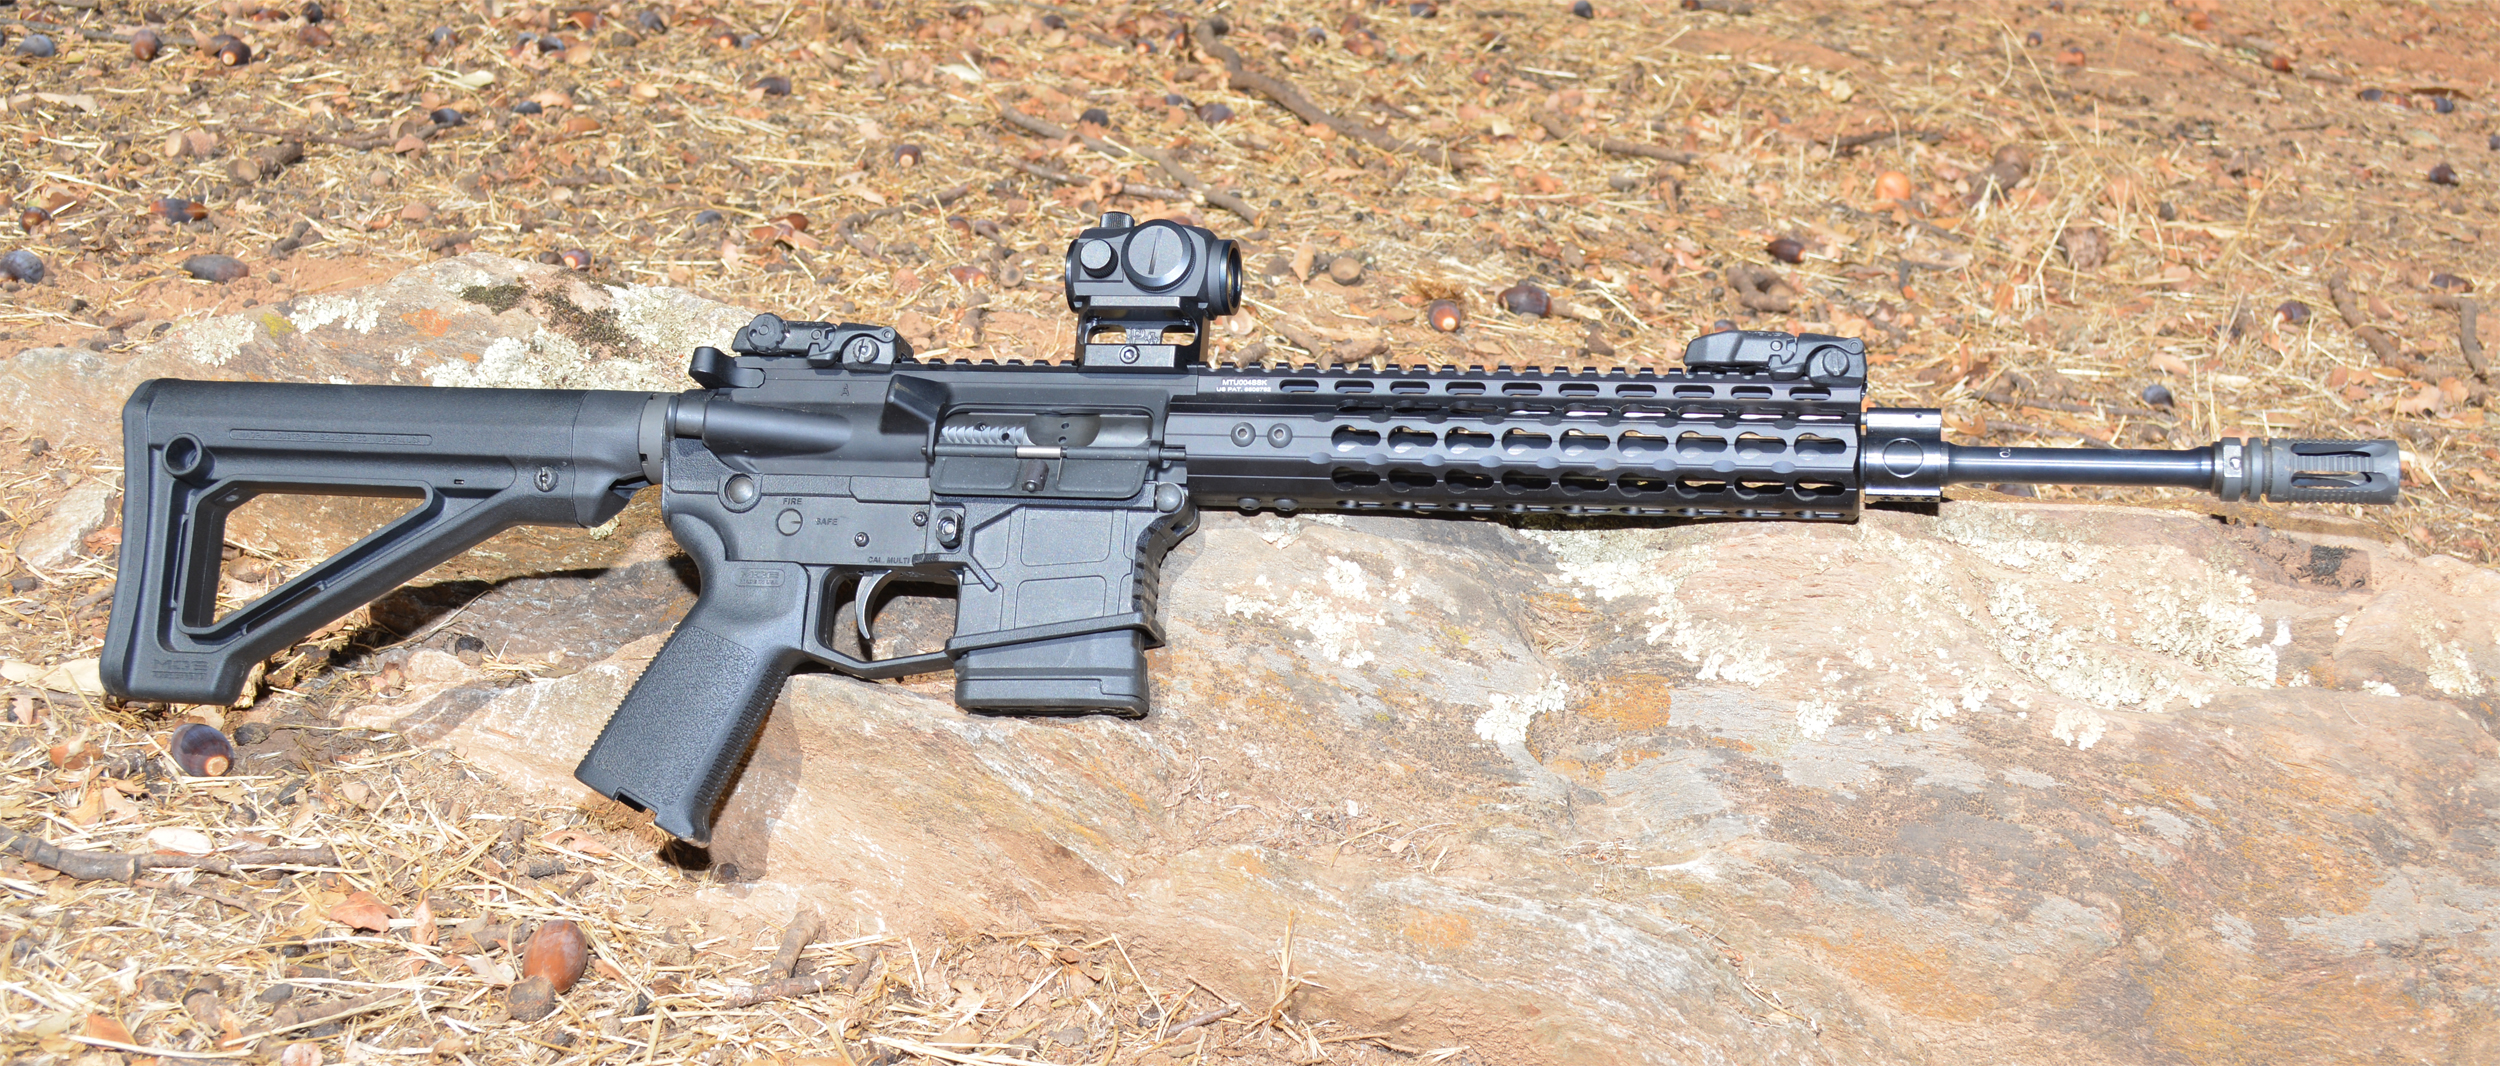
The final part of pivotal importance in the durability, accuracy and weight of the gun is the barrel. Based on my previous experience with their barrels, knowing both their quality and pricing, I immediately went to Faxon Firearms. All of their 14.5” barrels are chambered in 5.56 NATO and have a 1-8 twist. I actually spoke with one of their folks to help pick this barrel. They have a couple of barrels that I was considering for this project, and even though it is not the lightest one available, I chose their new Gunner profile in a 14.5” length with a mid-length gas system. The reason I chose that over their pencil profile is that the Gunner handles the heat of continued fire (without affecting accuracy) better than the pencil profile, and the weight difference is only a scant 1.76 ounces.
The majority of the other parts chosen were done so based on their prices as opposed to weight. Standard parts kits, standard flat top upper receiver, standard milspec M16 BCG, buffer and tube, etc. The full parts list can be found at the end of this article, and includes the list price of each item and where I bought them. If you are planning a similar project, you can substitute items as you see fit, just realize that typically with weight reduction, comes added expense.
Machining & Assembly
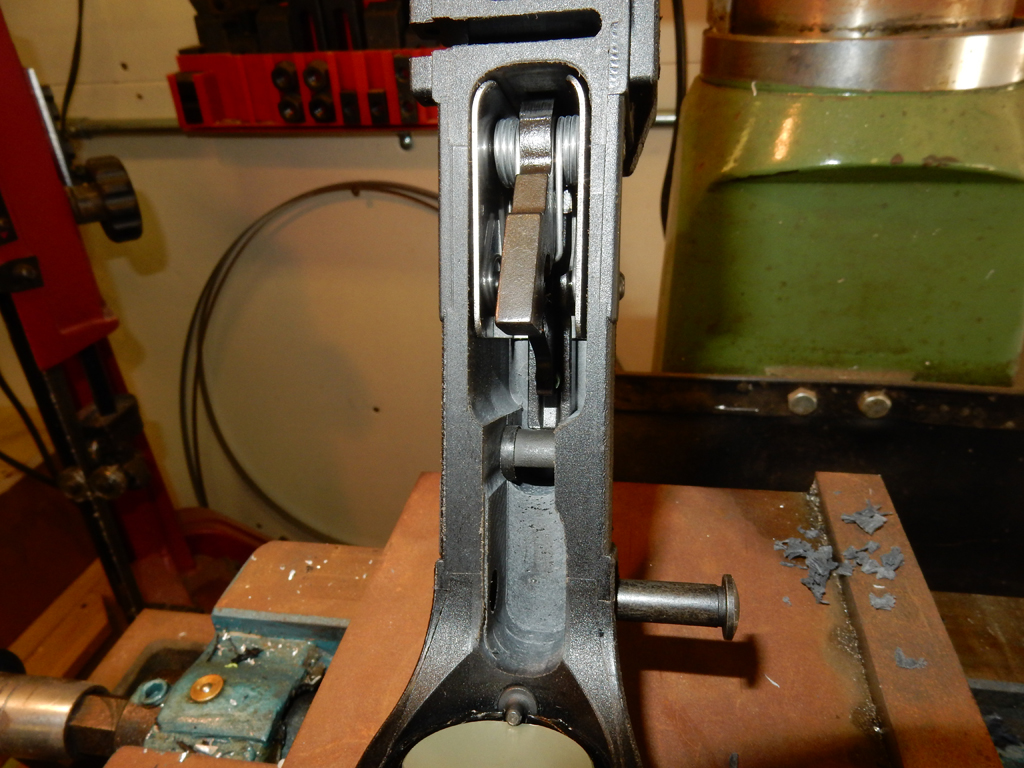
Once I had my box of parts finally gathered up, I hit the shop and completed the lower receiver machining. This was the first time I had put my hands on JMT’s Gen2 receiver. The instruction and machining was the same as the Gen1, and all went perfectly. Once I was done with the machining, I was extremely happy with the final product. This was by far the best job I had done machining an 80% lower.
I dropped the CMC trigger in and inserted the pins with their retaining screws, with a drop of blue Loctite on each. Installed the remainder of the lower parts kit and used a Magpul MOE grip. As I expected, the JMT lower accepted all the parts without a single issue. In an effort to reduce a little weight but still keep good ergos, I used a Magpul MOE fixed carbine stock, which is the same basic shape as the adjustable models, but eliminates the adjustment hardware and replaces it all with a single pinch bolt that keeps the stock in place.
When it came time to assemble the upper, I pulled the Faxon barrel out of the tube and inspected it. Just like my previous experience with another of their barrels, I was impressed with the overall appearance and finish. The barrel was a perfect fit in the upper, and when it came time check it, I found the headspacing was perfect as I expected.
Again, based on some past experience, I chose to use a forend that many might overlook based on the brand name, but I used one on a past project, purely as a money saving option, and came away very impressed with it. The forend chosen for this project was the 9” (mid-length) UTG PRO Super Slim Free Float Keymod rail. Unlike many of their products, this one is made right here in the USA. The diameter and profile are very similar to the BCM KMR, but at about half the price and at very little additional weight. I would not expect this rail to be as sturdy as the BCM KMR, but it also might surprise you. As with many free float forends, the barrel nut is proprietary. I installed the barrel nut and torqued it to specs using the supplied tool, then slid the forend into position and secured it with the six (6) screws, after again applying some blue Loctite to ensure they don’t loosen up.
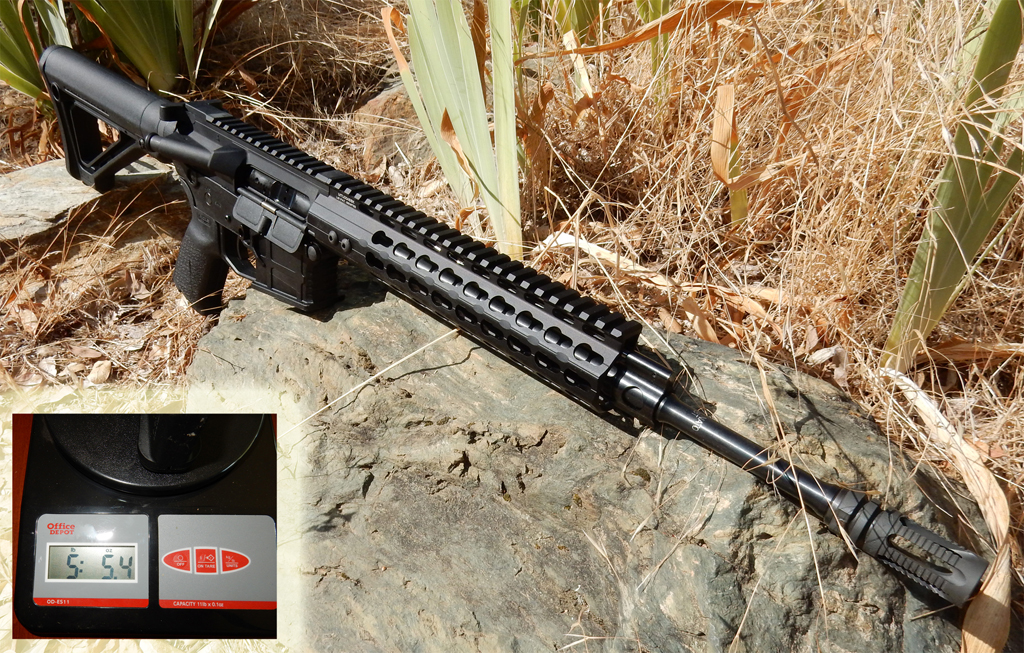
Being that this is a 14.5” barrel, I needed a longer muzzle device to meet the minimum length of 16”. I happened to have a Yankee Hill Machine Phantom in one of my parts bins, which is not only a lightweight muzzle device, but it is also one of the lower priced options available, both criteria for this project. I drilled the Phantom for the required pin, installed it on the barrel with the crush washer, then carefully drilled the barrel (careful not to drill too deep and into the bore), installed the pin and welded it in place. After welding it, I touched up the weld with some cold blue and it was barely noticeable.
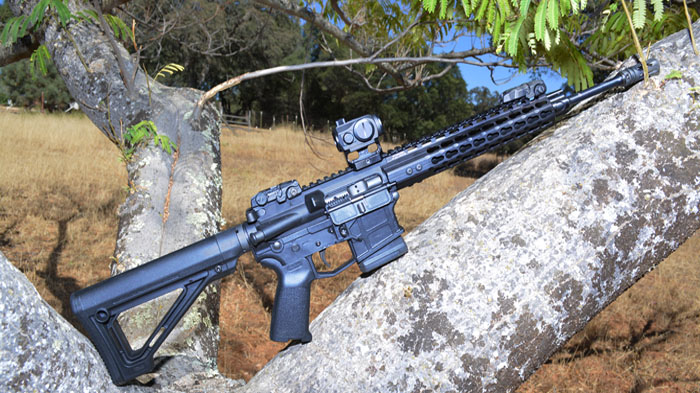
The muzzle device was the last part to go on. Now for the moment of truth, it was time to put this thing on my Office Depot digital postal scale and see the final results. Fully assembled (without sights) this gun came in at 5 lbs 5.4 oz (5.3 lbs). That is not the lightest rifle out there, but it is still very light. Picking this thing up, it feels like a toy, especially when I compare it to my LWRC duty rifle that I carry in my patrol car.
Obviously, I can’t shoot this rifle (accurately anyway) without some sort of sights or optic on it. I decided to throw some Magpul MBUS on it as back-up iron sights (lightweight and reasonably priced), but for the optic there were a lot of options. I have tested a large array of budget conscious red dots (seeing as cost is one of the primary considerations with this project) over the last few years. Based on the results of that testing, I decided to go with my favorite by a long shot; the Primary Arms Advanced Micro Dot. It is a fantastic little red dot with a crisp, clear 2 MOA dot, 50,000 hours of battery life, tiny size, low weight and a price that is less than half that of the least expensive Aimpoint or EOTech.
Once I had installed the back-up irons and the red dot, I weighed the gun again, just to see what the final number was, and I was quite pleased. Total weight: 5lbs 12.6oz
On The Range
As I do with all newly built guns, I loaded the first magazine with only three (3) rounds. I do this just in case something is amiss and the gun decides to go full auto on me (yet to happen to me, but I have read horror stories). All the dry firing/cycling in the world will not replicate the forces induced by actually firing the weapon, so I always choose to be safe with a brand new gun.
As I had not attempted to bore sight this gun, I stepped up to 25 yards and aimed at some fresh paper using the MBUS sights. I thumbed the safety off and fired the first round. All went as it should, so I fired the next two, and again all was well. I loaded up a few 10 round mags (the irony of being a cop in CA, I can own all the 30 round mags I want, and can use them all day long in my LWRC, but as soon as I put one of them in this rifle, I have committed a felony – as most of you already know, gun laws make zero sense) and set about zeroing the iron sights and the red dot. After only one mag, I had both sighting systems zeroed at 50 yards and was ready to do some testing.
That first day out, I did quite a bit of shooting. I did not keep track of the number of rounds fired, but based on the number of times I was reloading magazines, it was several hundred rounds. Note to those of you living in free America, constantly reloading 10 round mags sucks. During that initial outing, which was cut short due to time constraints, the gun functioned perfectly without a single malfunction. I was not checking the accuracy at this point per se, but I had no difficulty hitting my targets, even when firing rapidly. That said, while the YHM Phantom functions awesome as a flash hider, but it does little to help control muzzle flip. If cost were not an option, this gun would benefit hugely from the use of a Battlecomp 1.5.
Several more shooting sessions came and went without any malfunctions, and without cleaning. The only treatment this gun received before performing accuracy testing was the addition of some lube on the BCG.
Accuracy Testing
When it came time to do the accuracy testing, I swapped out the Primary Arms red dot for my Nikon P223 3-9x scope on an M223 mount. If you have read my reviews before, you will know that I do not remotely claim to be a precision shooter, but I am working on that. Sadly, due to some recent changes in my day job, getting to the public range has gotten much more difficult, and as such, I had to resort to doing the accuracy testing here on my home range which is limited to 50 yards.
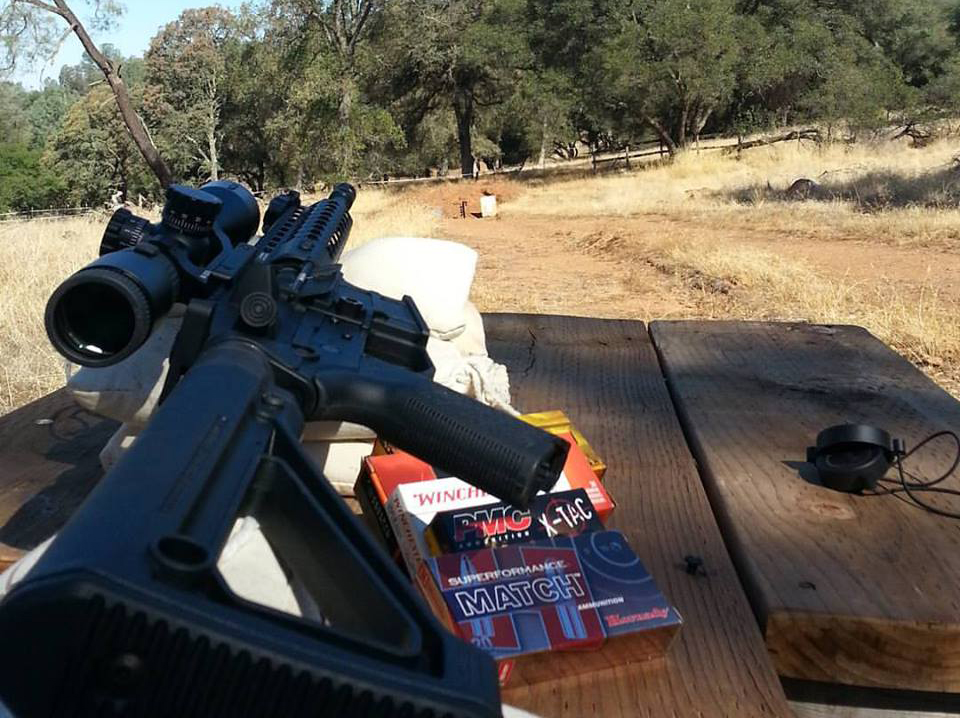
When shooting the rifle for accuracy, I used several different loads from different manufacturers and with different bullet weights in an attempt to find one that shot the best. The ammo used (listed in no particular order) consisted of Wolf Gold .223 55gr, PMC X-Tac 5.56 62gr, Winchester White Box .223 62gr, MSR Fusion .223 62gr, Hornady Superformance Match 5.56 75gr, and lastly, Federal Premium .223 77gr.
None of my groups were spectacular, but none were horrible either, and surprisingly, the accuracy difference between all the different loads was minimal. Groups ranged from 1.25” on the high end down to .75” on the low end, with the Hornady load turning in the best group of the day.
Final Thoughts
Upon initially assembling this gun, I was really happy with the results, and that was before shooting it. It felt great shouldered, and the weight, or lack thereof, made me smile every time I picked it up. The trigger was excellent, with a nice, predictable break and a great reset. After putting a bunch of ammo through it, I am even more pleased with it. It runs flawlessly, accuracy is as good as I could ask for and in terms of accuracy, it is not finicky about what you feed it. But most of all, the total price is quite reasonable, and at 5lbs 12.6oz complete, it is stupid light. I would not hesitate to use this rifle as a ranch gun, for home defense, or just as a fun gun to shoot. This inexpensive, homemade AR turned out to be one of my favorite rifles.
Thanks for reading, and if you have any questions, I’m happy to answer.
-Matt
Parts List *
- Lower Receiver – James Madison Tactical 80% ($99.95 – JMT)
- Upper Receiver – Aero Precision Stripped ($69.99 on sale – Brownells)
- Barrel – Faxon Firearms 14.5” Midlength gas, Gunner profile ($165.00 – Faxon)
- Gas block & tube – Faxon ultra low profile ($45.98 package price w/ barrel – Faxon )
- Upper Receiver Completions Parts Kit – DPMS ($17.99 – Brownells)
- Lower Parts Kit W/O fire control – DPMS ($29.99 – Brownells)
- CMC 4.5-5lb trigger ($167.99 – Primary Arms)
- Complete Milspec M16 Bolt Carrier Group – Anderson Mfg ($85.00 – Primary Arms)
- Freefloat Midlength Keymod Forend – UTG Pro ($127.00 Ebay)
- Milspec Buffer/Tube Assembly ($25 – Primary Arms)
- Stock – Magpul MOE Fixed Carbine ($28.45 – Brownells)
- Charging Handle, milspec *
- Muzzle device – YHM Phantom *
* A few parts are not priced because I already had them in my parts binsTOTAL – $862.34
WEIGHT – 5lbs 5.4oz
Additional Items
- Red Dot Sight – Primary Arms Advanced Micro Dot w/ riser ($179.99 – Primary Arms)
- Back Up Iron Sight Set – Magpul MBUS Gen2 ($89.99 – Brownells)TOTAL – $1132.32
WEIGHT – 5lbs 12.6oz
Suppliers
- James Madison Tactical (JMT) – http://jamesmadisontactical.com/
- Faxon Firearms – http://faxonfirearms.com/
- Brownells – brownells.com
- Primary Arms – http://www.primaryarms.com/